
Quickstart
This guide takes you from a product URL to one saved test case and its first background run. You will use the AI QA Agent to propose coverage, review a draft, and execute the case.
Before you begin
You need a HiTest workspace, available credits, and a web application reachable at a domain URL. Choose a small workflow with a visible result: create an item, change a setting, or add a product to a cart.
The screenshots use a drawing application as an example. Follow the same steps with your own product. For your first test, choose a workflow that can run independently with data prepared for testing.
- ProjectTell HiTest where to start.
- DraftExplore one focused workflow.
- SaveReview the actions and outcomes.
- RunCheck the result and evidence.
1. Create a project
In HiTest, open the project selector and create a project. Enter a Project name, the Base URL of your application, and a Project slug. Keep the suggested slug or choose a recognizable one, then submit the form.
Use the environment you want to test. The browser needs a reachable domain; localhost and IP-address URLs are not supported.
If your workflow needs login
Open Test accounts and create an account using credentials that already work in your application. Select this account in the agent's setup card in the next step.
For a public workflow, continue without an account. See Test Accounts for role-specific login and authenticator-based 2FA.
Check your progress
Your project opens with the correct application URL. If login is required, a Test Account is available to select.2. Ask the agent to generate coverage
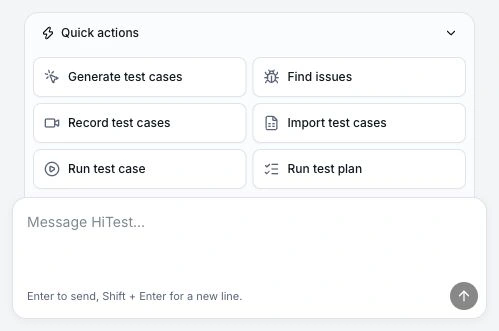
Click AI QA Agent in the project header, then choose Generate test cases from Quick actions.
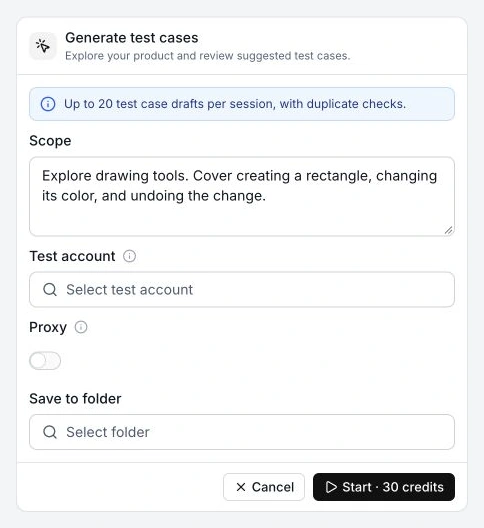
In Scope, describe one workflow and its important outcomes. For the drawing app example:
Explore drawing tools. Cover creating a rectangle,
changing its color, and undoing the change.
Choose your Test Account if needed. Leave Proxy off unless your application requires it. A destination folder is optional for this first case. Click Start to begin browser exploration.
3. Review and save one test case
HiTest opens the application in Live View and proposes test case drafts. When the drafts are ready, choose one that represents a useful, focused check. Review:
- Starting point: Can the case begin from the project's Base URL without another case running first?
- Actions: Are the instructions specific enough to follow?
- Expected results: Can success be observed in the application?
- Test Account: Does the selected account have the role and data this case needs?
For example, “Change a rectangle's fill color” should describe creating or selecting a rectangle, changing the fill, and verifying the visible color. “Check drawing tools” is too broad to be a useful case name or success condition.
Edit the draft if needed, select it, and click Create. Open Test cases to find the saved case.
A draft is proposed coverage
Generating and saving a case does not verify that it passes. Run the saved case in the next step to check it against your application.
4. Run the saved case
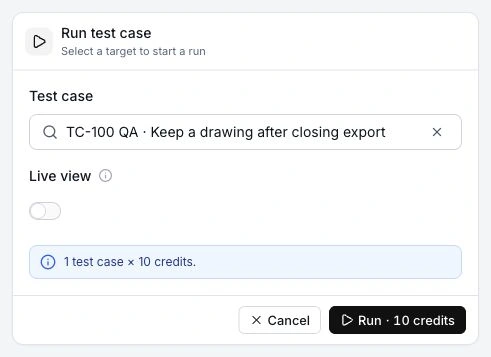
In the QA Agent, choose Run test case, select the case you just saved, and leave Live view off. Click Run, then follow Run created. View to open the result.
This starts a background run and saves its history. You can also find it from Runs in the project navigation.
Want to watch a case instead?
The agent's optional Live view mode shows the browser and an inline result. It adds a Live View charge and does not save a background Runs history entry. Use the default background mode for this walkthrough.
5. Review what actually happened
Wait for the run to finish. Check the case outcome and any failed reason. Open the recording when it is available; video can still be Processing after the test result is saved.
| What you see | What to do next |
|---|---|
| Passed, with the intended case executed | Keep this as your first verified check. |
| Failed with a product behavior that contradicts the expected result | Inspect the evidence and any linked Issue. |
| Failed because login, data, or instructions are wrong | Correct the relevant account, data, or case before running again. |
| A result with no executed cases | Check what was selected; a status alone does not establish coverage. |
Check your progress
You can find the saved case in Test cases and its execution in Runs, and explain what the result proves about that workflow.